My Method for Naming and Tagging Photos and Videos

I have previously written about my method for organizing digital photos and videos. Within the many folders are thousands of files, most of which have been manually renamed. This naming and tagging of photos is a process that I started when my son was born in 2002 and has continued ever since.

Each file is individually named to tell either who is in the photo or briefly where or what the photos is about

How to label photos and videos

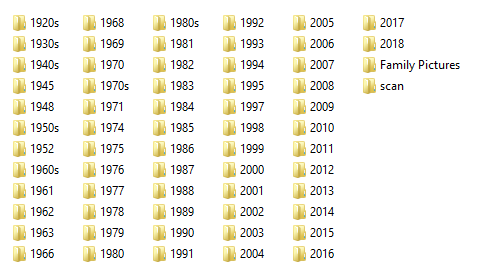
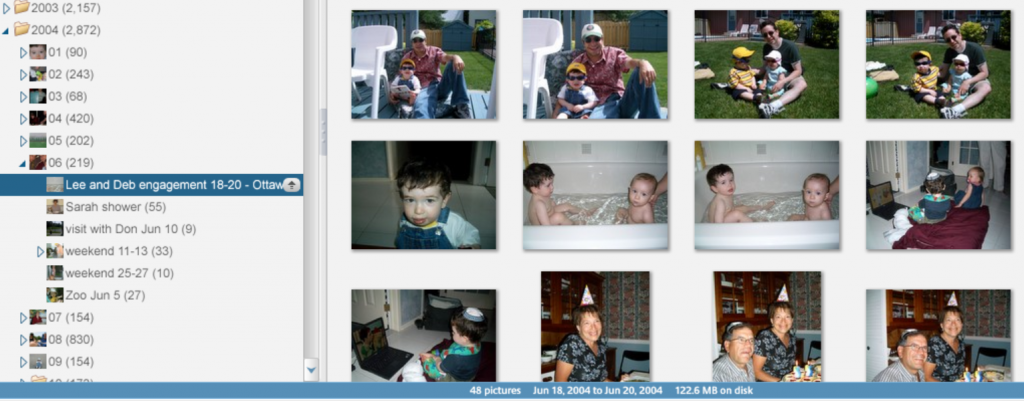
After I have taken pictures at an event or at the end of a month, I copy all of the photos and videos from my phone or camera to a folder on my computer, let’s call it “incoming photos and videos”. From this folder, I then copy groups of photos and videos to folders based on the date and event. For example, in the view above, there are numerous events in June 2004 that are each in individual folders.

Within each folder, I then rename each file. I use a thumbnail preview in Windows Explorer or I use another program for managing photos. For years I used Google’s Picasa, which has now been discontinued. Even though Google no longer supports it, I often still use it for my viewing and renaming process.

A similar view from above but with Google’s Picasa software

Picasa, or most other photo management programs allows you to view a folder of pictures and easily make changes such as adjust brightness or rename. In Picasa, I can make the thumbnail views larger or smaller as needed.

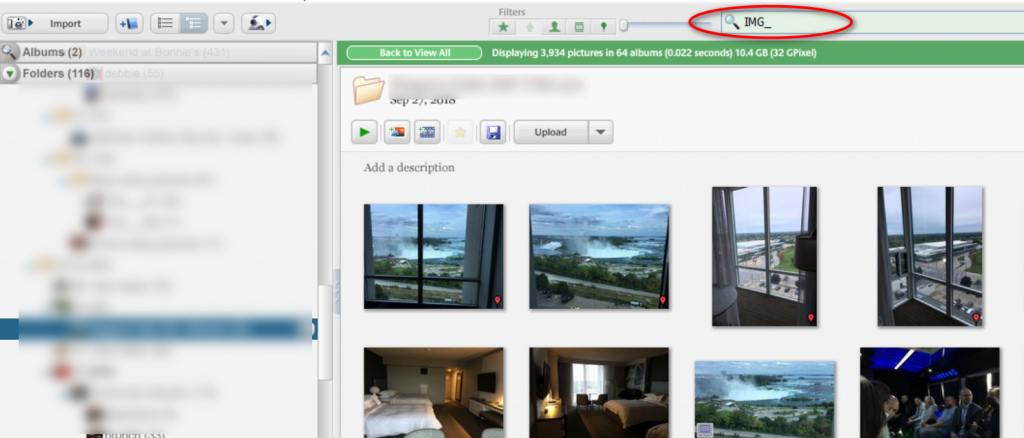
Another convenient feature of Picasa is that I can filter what pictures I want to see. For example, I take a lot of photos with an iPhone. These photos and videos are always named in the form of IMG_. By typing “IMG_” into the search bar, I can see all the photos and videos that I have not yet renamed. Other cameras have their own naming format so this is a way to find non-renamed files.

By searching for a specific set of characters, you can find files not yet renamed

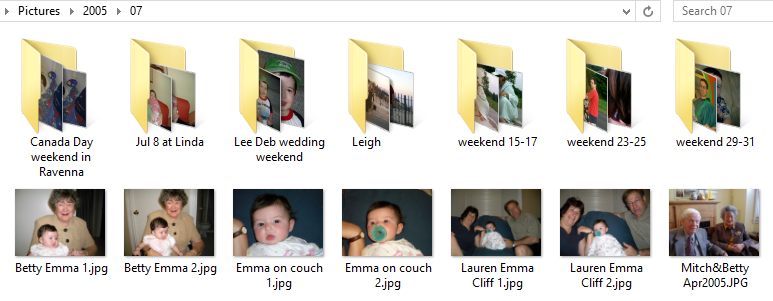
For years I have gone about the process of renaming files. Sometimes it’s a bit more complicated when there is a group of 20 people. For these photos I usually simplify the name to something like “group at lunch”. The numerous photos of about 1 to 5 people are very easy to handle, just name the file with their names.

The Power and Benefits of Renaming Photos

Earlier I showed how I could narrow down photos that haven’t been renamed by searching for them in Picasa. I could do the same in Windows Explorer or in any photo management software. The real power is in finding what I have renamed. A few examples.

For my kids’ birthdays, I often make my own birthday cards. I can search across years of photos to find old pictures of them. I can search for pictures of the kids with specific people. Of course, if you have several people with the same name, you will have to go through a bunch of pictures to find the right one but even this can be handled by naming the files with first and last names. The main benefit of this system is that it’s independent of any computer or software. I can start this process on a Mac and then move all my files to Windows. In 10 years I can move these photos to some new computer and it should be able to handle the thousands of folders and files.

What about just using the cloud?

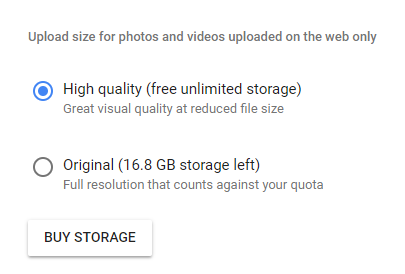
Yes, I can put all the above mentioned photos into Google Photos and let it sort it out for me. Google will let me view photos in chronological order and put together albums. It’s even gotten smart enough to detect who people are and once I tag them it will find them in future photos. Isn’t that more efficient than my system?

Yes, it is more efficient on the surface but what happens if Google goes away in 20 years or starts charging huge amounts for the service? I can get all my photos and videos out of Google but in what format? I’ll have just a massive folder, or maybe set of folders with files. I don’t think that in 20 years I’ll want to start labelling 100,000 photos and videos!

To me, the eventual solution may not yet exist. I would like to see the best of both. A program that runs on my computer and lets me manage my photos in simple folders and files. Add into this a plug-in to something like Google that analyzes photos and automatically renames them based on who is in them or some other criteria. That would make the process more efficient and have long lasting value as there still would not be a tie in to proprietary software.

Facebooktwitterredditpinterestlinkedinmail

Google Photos, great in the cloud, not so good from your computer

I recently read an article about Google Photos in the New York Times. There are numerous places online to store your photos and while I had tested out Google Photos a few years ago, I hadn’t continued to use it as an every day photo system. In this article, the author talked about the advancement of artificial intelligence and how accurately it was able to determine pictures of the same person. One of the main problems we face with taking so many digital pictures is that we can’t find them and end up not looking at them. Google has been working to solve this problem and their solution is to have you upload all your pictures and let Google figure out what is related, be it people, places or things.

This got me thinking about how I could use Google Photos along with the method I already use for storing and organizing my photos. I still prefer to have my master copy of photos and videos on my computer, stored by year, month and events. It’s backed up in numerous places, including offsite. What if I could have the best of both my system and Google? It was worth a try.

Syncing up to Google

I already have a Gmail account and I have uploaded numerous photos over the years, but more as standalone albums to share with people online.The first decision to make when putting your photos and videos in Google is cost. You can let Google compress your videos and photos and then there is unlimited storage, but if you keep them at their original size then you’ll have to buy space at whatever the current rates are.

I looked up the compressed rates and they’re pretty reasonable – 16 megapixel for photos and 1080p for videos. If you use this as secondary storage, then it’s not an issue, and for most cases, these are good enough quality unless you are doing professional photo or videos work.

Setting up the sync

First, before doing anything I made sure that my master copy of photos was backed up. I have a regular process where the external hard drive of my photos is backed up to network hard drives in my house. Once this was done, I continued.

I installed Backup and Sync from Google. It walks you through the steps for installation including deciding what you want to sync and what not to sync.

A few items to note in the screenshot above:

  • I clicked on Choose Folder and picked my external drive where I keep photos. That is the box that is checked on the list of folders
  • I chose the High quality, free unlimited storage option
  • I set it to don’t remove items, so that it would upload only and not affect files on my computer

I then started watching as photos and videos started getting uploaded.

Note that you can click on the Google Sync icon in the taskbar, shown above with a red circle.

Something isn’t right

As I watched the screen scroll with photos and videos being uploaded, I occasionally saw the word ‘deleted’ or ‘failed’. After awhile, it stopped and couldn’t sync a whole bunch of files. I knew it couldn’t be close to done as I have over 50,000 photos and videos! I use a program called FreeFileSync to back up my photos and videos to another hard drive so I used it in reverse to show me what files were on the backed up hard drive and not on my primary one. It showed about 60 pictures that somehow got deleted. That concerns me as I specifically chose the option to NOT delete files. I was able to put everything back because of the backup.

I am still experimenting with the software but at this time I cannot recommend Google Backup and Sync for anyone to use with their main copy of photos and videos. If you want to get your photos and videos into Google Photos, I would suggest something along the following lines:

  • Copy all of your photos to a temporary location
  • Install Google Backup and Sync
  • Point Google Backup and Sync to the temporary location
  • In future, install the app for your phone and let it sync from the phone directly

Facebooktwitterredditpinterestlinkedinmail

The Case of the Failed Hard Drive and the Files left Behind

When we think about data protection and backup, it’s easier to get an idea of what it’s all about if we can see an example in real life. Here is the first of hopefully a number of case studies of data loss and how to handle it.

Elaine is a retired social worker. She has used a computer for many years, mostly in her working life and also for keeping journals writing memoirs. Elaine is also very artistic and enjoys creating greeting cards for family and friends using her computer.

Several months ago, Elaine’s computer starting making loud noises and then Windows wouldn’t start. Since the computer was 10 years old, I advised her that this was a good time to look at getting a new one. Even if the computer didn’t start properly, we could could still possibly retrieve some or all of her files from the old one. Elaine ended up buying a new laptop and was able to get it up and running. Since she had subscribed to Dropbox a few years ago, most of her files were right there waiting once it was installed. But not all files – more about that soon.

The Diagnosis

Elaine brought over both her old and new laptops. I started up the old one and sure enough heard the fan motor loudly humming away. Windows did not start up so I was able to get to System Recovery. I chose Startup Repair.

From here it ran a scan trying desperately to find an installation of Windows to fix. Unfortunately, it came up empty, as you can see from the image below. If there were an installation of Windows to repair, it would have shown up in the list.

This meant that there wasn’t much to do on this computer. There are recovery tools that can be run that are booted up from a USB stick or a CD but I decided to try something else – take out the hard drive and attempt recovery from another computer.

I highly recommend keeping one or more extra hard drive enclosures in your computer supplies. These allow you to pop your hard drive into a box that turns it into an external hard drive. These usually come with USB cables so you can connect it up to any computer.

The Search for Files

Once connected, it didn’t look good for Elaine’s hard drive. I ran Windows Disk Management and looked at the hard drives listed. The following image shows a bunch of healthy, normal disk partitions. The one shown in red is RAW and this means that data corruption has occurred. Built-in tools for Windows will not let you look at or retrieve files from RAW partitions.

I did some research and found several programs that claim to recover files from RAW partitions. Several have free trials that will show you what files can be recovered but you have to pay to recover them. MiniTool Power Data Recovery will not only scan a RAW drive and show you what files it can recover but it will recover up to 1 GB for free. This is very helpful if you have a small amount of data to recover or want to test the software first to prove if it will work.

The Recovery

When I installed this software, it scanned the drive and came up with a many folders that it could recover. Elaine spotted several folders that weren’t in Dropbox, and therefore weren’t on her new computer. Since Elaine had less than 1 GB of data to recovery the free version of MiniTool was sufficient. Now that I have seen the program in action, I would recommend either the free or full version to anyone requiring data recovery.

Additional Data Loss Prevention

Elaine was very pleased when I found her numerous journal entry files and memoirs. She had saved all of these to folders not in Dropbox, therefore they were never backed up. Elaine had already invested in the paid version of Dropbox that provides 1 TB of data. I relocated all of her files to Dropbox and then reviewed where all the files were located. I then launched Word which is the primary program she uses for her writing. By default, Word saves its files in your documents folder. I changed this to Dropbox to ensure that all future created files are automatically saved in Dropbox. This should be repeated in all programs.

Elaine also brought over her digital camera as she wasn’t sure how to transfer files from a camera to Windows 10. I showed her how to put the SD card from the camera into the computer.

I then launched Windows Explorer and went through the process to import pictures from a memory card. The key take away here was not to use the default settings. I set the destination for copying the pictures and videos to Elaine’s Dropbox folders. This way the pictures would go directly to Dropbox. Elaine mentioned that she wanted to use the SD card as a backup for her pictures. I highly recommend against this. First of all, if you always keep your pictures on the memory card, how will you know what you have and have not copied to the computer? This makes for lots of duplicate photos.

Second, think of the memory card as your temporary storage for pictures. By emptying out frequently, you will always have lots of space for taking more pictures and videos. Of course, all of this assumes you are using a traditional digital camera and not a Smartphone.

In Conclusion

Elaine now has a new computer that contains all of her files. She was very fortunate that the files on her old computer were able to be recovered. Professional recovery services charge hundreds or even thousands of dollars for recovery. Software like MiniTool doesn’t work in every case so it’s helpful to try it first before engaging with data recovery professionals. By properly setting up save locations and having a proper system for using Dropbox or another cloud based service, you can make a computer failure more of a minor annoyance where you have to replace the computer instead of a disaster where your critical files are gone forever. Like the old cliche says, an ounce of prevention is worth a pound of cure!Facebooktwitterredditpinterestlinkedinmail

The long and short of it – what data to keep and what to delete

My parents are in the process of downsizing their house to a smaller one. Part of the process is going through years of papers and memorabilia to determine what to keep and what to throw out. That seemingly important file from 20 years ago doesn’t look so critical when you look at it now. The collection of National Geographic Magazines might seem valuable but do you (a) need it and (b) do you have anywhere to put it. With digital data, there are many of the same issues and it’s important to be able to determine what is important for long term vs short term.

An important distinction to be made between physical and digital data is the amount of space it takes to store both. Having to find place for 500 magazines is not quite the same as having a big enough hard drive to store 500 digital copies of the same magazines. Hard drives continue to drop in price so it’s feasible to keep buying larger hard drives as your quantity of data increases. And it’s also like that your current hard drive purchase will be cheaper and higher capacity than the previous one.

This is not an exhaustive list, but it should help you think about what you should and shouldn’t keep.

This view of the Cabot trail in Nova Scotia is definitely a keeper

Photos and Videos

This summer we went on vacation in Nova Scotia and Prince Edward Island. We took lots of great pictures of the scenery. When we returned from the trip, I went through the hundreds of photos that we took and DELETED many of them. If there are 10 pictures of a statue then only the best one needs to be kept. The key thing here is to do your purging of pictures as soon as possible. If you wait until the end of the year then there’s a good chance you’ll never delete anything. The same goes for videos. Check your videos after you record them and if they’re no good, then get rid of them!

Financial Documents

These include all your digital bills and statements, receipts for products purchased and everything to do with taxes. I’m not one to give financial advice but I have been told to keep all tax related documents for 7 years. I have also heard that when there’s a tax problem, the tax department might go back even further. The reality if you save copies of documents then the files are not too big, at least compared to photos and videos. If you don’t do much else in digital filing, at least have a folder with files for years. Put everything in each year’s folder. Take it further by having folders for bills, statements, receipts, taxes, etc. This way if you decide to get rid of certain years, you know that the files are broken up by years. And it has the added bonus of making it much easier to find what you’re looking for.

Documents created in word processors and spreadsheets

Some of these documents are related to taxes or finances and should be filed along with the statements. Others are quick letters or notes that you might take that are never needed again. These too should be kept in folders by year so that you can quickly check through them at the end of the year to see what you actually need. Many of these are also small files that over time do not take up that much space on our ever increasing sized hard drives.

What to do with files that are kept?

The key take away here is to have an effective filing system so that you can better locate what you want to keep and what to get rid of. In future posts, we will talk about various methods for long and short term archiving. You should be able to actually find what you choose to keep!Facebooktwitterredditpinterestlinkedinmail

Review: Apple iCloud Photo Library

On a recent vacation to visit family in Montreal, I decided to turn on Apple iCloud Photo Library so I could give it a proper test. With my system for storing photos, I wasn’t so sure that iCloud Photo Library was for me but I get asked about systems like it all the time so I decided a test was in order. Let’s take a step back. When iPhones first came out, all photos and videos were stored on the phone. When you wanted to do something with them off the phone, you plugged your iPhone into a computer and transferred the photos. As we move to a more phone-centric world and always connected, having the ability to automatically have pictures stored in the cloud is an option. With iCloud Photo Library, as you take pictures and videos, they are uploaded to your personal Apple iCloud online space. You can decide whether or not to do this through cellular or only on WiFi. Let’s walk through how this is set up and some important settings.

Enabling iCloud Photo Library

First, when I mention iPhone here, it also applies to iPads. If you have a cellular enabled iPad, then all the cellular considerations apply to. For WiFi only iPads, it’s only going to upload when it has a WiFi connection. On your phone, go to Settings-> Photos and tap on iCloud Photo Library. If you expect to take many photos and don’t want to have to manage space, choose Optimize iPhone Storage. This will reduce the size of photos on the phone but the full sizes remain online. enable iCloud Photo Library 
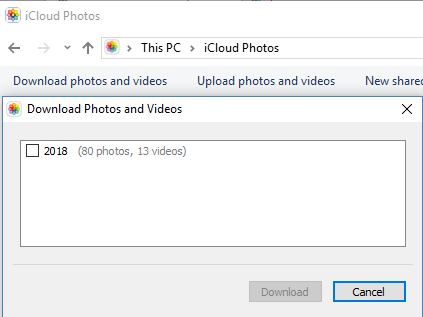
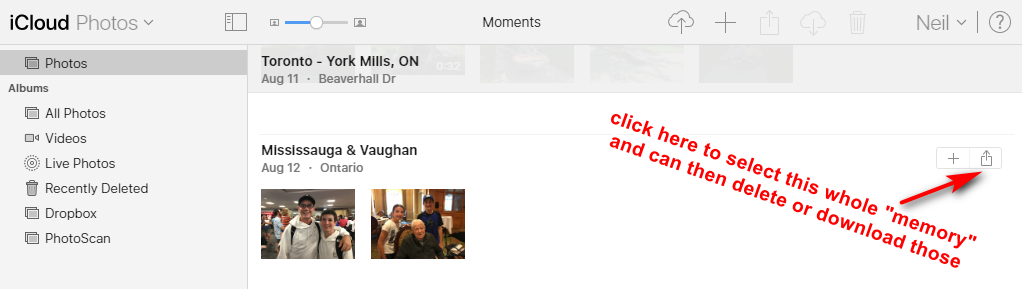
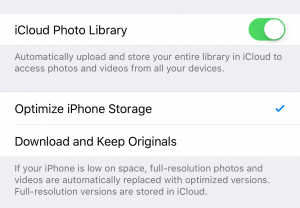
That’s all there is to enable iCloud Photo Library. Now when you take photos and videos, they will get uploaded to your iCloud account. If you have several Apple devices, you’ll be able to view and even share these photos and videos from anywhere. And even from any web browser you can log in to icloud.com to see and manage your pictures from there. As time goes on, you’ll have all your photos easily available. So in summary, these are the pros for enabling iCloud Photo library:
  • backs up automatically to the cloud
  • becomes available on all devices including any web browser
  • easy to share pictures with others

The Other Side of iCloud Photo Library

When the great features of systems like iCloud Photo Library are talked about, it’s always about the convenience and protection of your photos and videos. The questions I always ask about any system that stores my precious memories include:
  • How easy is it to get my photos and videos out in the future in case I want to change to a different cloud provider?
  • What happens if they go out of business?
  • What happens if the system is hacked and I lose everything?
  • If they do stick around, how can I ensure that I can give these photos and videos one day?
So let’s look at the “cons” to iCloud Photo Library. First, if you use Microsoft Windows, like I do, then it’s not as tightly integrated with your computer as it would be with a Mac (more on that analysis when I get my hands on a Mac)

Hard to sync photos between iCloud and your computer

It’s not easy to sync up pictures to a computer if you use “my” method of storing photos. You can install iCloud for Windows which gives you some tools for synchronizing things like web browser bookmarks, email with Outlook and photos. As you can see here, you can both upload and download photos from your computer. In this case, I have 80 photos and 13 videos from 2018 that I can download to my computer. There’s no way to say only download photos that I’ve added since last time or a specific range.

It would be very easy with this download method to lose track of what is in folders on your computer vs what is in iCloud. If you keep your photos in organized folders by year, month and event, a much better choice is something like Dropbox or OneDrive.

Managing photos in iCloud web site

If you log into icloud.com, you can browse through all your photos. There is no easy way to delete multiple photos – no ctrl-click, to select multiple, all you can do is select a “memory” which is photos on a certain date or album. Otherwise it’s one by one.

Long term existence of the service

At the time of writing this, 2018, Apple is in excellent financial shape and show no signs of going anywhere anytime soon. Having your photos in iCloud Photo Library works great as long as Apple keeps the service going, but what happens if in 20 years Apple discontinues the service or makes such a drastic change that you don’t want to keep using it? If you care about the long term ability to keep these photos, then suddenly having to move all of them can be very difficult. If you create “albums” or any other proprietary structures in iCloud Photo Library, all you’ll likely get in a download is every single photo.

Summary and Recommendation

As I have said before, never rely on only one service. Because of the way that Apple traps you into their ecosystem without the ability to sync to other services, I am unable to recommend iCloud Photo Library for anyone who is relying on it as their sole source to store their photos and videos. In future posts, I will talk about how to effectively use different methods to both have access now to your photos and videos and protect them for long term. Facebooktwitterredditpinterestlinkedinmail

Instant Recovery from a Hard Drive Crash

Imagine this nightmare… you’re working on a large business report and with just a few more finishing touches to go, and you suffer a hard drive crash. Everything is gone and you have to explain to your client why you won’t have the report ready. Wouldn’t it be great to have near instantaneous recovery from this sort of disaster?

explosion over beach

With sufficient preparation you can recover and get back to work with either minimal or no loss of data. We need to change our view of our computers as a single point of failure / critical device to that of a simple appliance. If your coffee maker breaks, you might not be happy to have to replace it, but you can go out and buy a cup of coffee, get a new coffee maker and be back up and running very soon. By treating your computer as a replaceable and disposable device, it changes the way that you are able to work.

Separate your data from your computer

Right now you may have a bunch of documents and spreadsheets in a folder. Another folder has pictures and videos while your email has been downloading and getting stored on your computer for years. In previous posts I talked about moving your email to the cloud and I talked about the topic of cloud based files too.

Using Dropbox, OneDrive or Google Drive allows all of your critical files to be kept both on your computer and in the cloud. Going back to the earlier example, if your report is stored in Dropbox then every time you save the file it gets uploaded to Dropbox. With Google Docs, it is automatically saved every few minutes. If you are on a plane or somewhere that you don’t have internet access, sync services like Dropbox let you keep working normally and then will sync up once it has an internet connection.

Email if kept in Gmail or Outlook.com means that you don’t have a dependency on your computer. You can still have it download a copy that stays in sync with the online version.

With prices for online storage coming down, you can pay about $100 a year for 1 TB or more of storage. This can store most picture and document collections so that all of your precious memories are securely backed up online.

Making an Instant Recovery from a Crash

So now that you’ve got everything protected, what do you do when disaster strikes and your computer crash makes working impossible? The price of computers has come down substantially. Even a very basic laptop can be had for under $300. I have discovered an excellent source of high quality and powerful computers is the refurbished market. One example is Dell. Numerous companies lease computers for 3 or 4 years at a time. Once the lease is over, the computers go back to the manufacturer. In the case of Dell, they have an online store to sell these. Check with your country, in Canada it is dellrefurbished.ca. I have bought several laptops and desktops from Dell Refurbished and have been very pleased with the results. As an added bonus, they have sales several times a year so be sure to do an online search for “Dell Refurbished coupon code” to save up to 50%.

So where am I going with this? If you buy a refurbished computer, then you have a standby ready to go at a moment’s notice. If it’s a laptop, you can order it, set it up with what you need, such as Dropbox and your favourite software. Put it away and then you have it ready to go. As far as insurance goes, this is a good option, especially if your livelihood relies on having a working computer.

life insurance

With computers, it’s not a case of if it will fail but when. Having a strategy where you don’t have to think about protecting your files from a crash is the way to a fast recovery. We buy insurance for our lives, cars and our health, so with the same way of thinking, we can insure our data.Facebooktwitterredditpinterestlinkedinmail

How will you view your smartphone photos in the future?

In the ‘olden days’, my grandparents went on vacation with a camera and several rolls of film. When they got back, there was the excitement of waiting for the film to be developed so they they could see how well (or badly) the pictures came out. The best shots went into an album and then the album went on a shelf where it could be viewed at any time. As the keeper of family memorabilia, I now have many of my grandparents albums that even 50 or 60 years later are still able to be easily viewed.

Let’s compare this with what happens today. You go on vacation and take 500 pictures with your smart phone. Maybe you subscribe to an online cloud service like Apple iCloud so the pictures get safely and securely stored. You can view them on your phone at any time and send pictures to family and friends and post them to social media.

From the description of how things happen today, you might say that we have come so far and progressed so much. I say that it’s half correct. With these easy to use tools for capturing, storing and sharing, we have the ability to have quick access to our memories. But what happens in 50 years from now, will your children and grandchildren be able to view these pictures or even know how to access them? If I take care of photo albums, they could last for several generations.

Now, let’s not forget that paper based prints don’t last forever. In time, there are acids and other chemicals at work that slowly disintegrate these precious memories. The real question to ask is this – how can we take the benefits of both ‘old fashioned’ printed photo albums with the convenience and ready access of modern digital assets? There are several things to consider:

  • If my digital files are organized then I have a better chance of finding what I’m looking for – be it now or in 20 years
  • If I determine what is important to me then I can revisit how I’m protecting it over time, not when something goes wrong

The reality is there isn’t a one size fits all approach to protecting your digital files for the future. From my experience, working with clients to determine what approach to take is the best way to determine a solution.

A solution that combines multiple safe secure storage methods plus easy access to digital files is one that will be useful for a period of time – but then it must be re-evaluated. Just as early photos used a process called Daguerrotype that eventually changed to modern photo development, so does a digital process change over time.Facebooktwitterredditpinterestlinkedinmail

World Backup Day 2018

If you went on Google this past weekend and searched for “world backup day”, you would find lots of talk about backup. Who started this? To be honest, I’m not really sure, but it doesn’t matter – it’s a really good reminder to make sure that you are backing up your data.

According to www.worldbackupday.com, many people aren’t backing up properly:

If you aren’t backing up at all, there are 2 things you can do to get started:

  1. Choose an online backup provider and start backing up
  2. Buy an external hard drive and start backing up

Ideally, you would do both of the above.

Cost of Hard Drive Storage Over Time


The cost of hard drives per gigabyte has dropped dramatically over time. I recently had to purchase a new hard drive for home backups and I was able to purchase a 4 TB hard drive for $160. You can get these even cheaper but I needed these for type of systems known as Network Attached Storage (NAS). More about that in a future post.

At this price, it cost 4 cents per gigabyte of storage. Let’s compare this over time. I found this chart at www.mkomo.com/cost-per-gigabyte-update

This shows how the cost per gigabyte has gone from over 1 million dollars in 1980 to 4 cents now in 2018. It wasn’t even possible to buy a hard drive at 4 TB in 1980, but if you could, it would have cost 4 billion dollars!

The point I’m making is that it has never been so cost effective to buy so much hard drive storage. If you have tons of videos, pictures, music and documents, you can buy more than one hard drive for backup plus a subscription to an online backup service.

Take the Plunge and Start Backing Up

Picture yourself in one year from now on World Backup Day 2019. You’ve been backing up all your data so you feel calm and relaxed, knowing that you’re protected from the dangers of ransomware and failed hard drives. If you’re feeling overwhelmed by the options, remember this: there can never be too many forms of backup. If you change your mind after 6 months and want to do something else, that’s fine, add it to your backup routine. Backup is peace of mind so start doing it today!Facebooktwitterredditpinterestlinkedinmail

My Method for Organizing Digital Photos and Videos

As you keep filling up your phone with pictures and videos and then occasionally copy them to your computer, you must be thinking, I must organize my pictures. This method is also very effective for backup purposes as it leads to an easier way of getting all pictures and videos backed up. More about that in a future post.

Folders on My Hard Drive

My main computer is a laptop with a relatively small hard drive. There isn’t enough room to store all of my pictures and videos going back many years. I purchased an external hard drive, similar to this one. Within the hard drive, I set up a folder structure:

You’re probably wondering how I have folders going back to the 1920s – there were surely no digital cameras then! I use these folders not only to store pictures taken now but also scanned pictures. This simple year method allows me to keep all pictures, regardless of where they originated.

Within each year folder, there are subfolders for each month. For example, in 2017 the structure is as follows:

Then, within every month, there is a series of folders and pictures. If there is a specific event, such as a birthday party or and outing where I took a lot of pictures, I would create a folder there. If I have just a couple of pictures that were taken while out, they are put in the folder for the month. This short amount of time spent figuring out how to organize your pictures is well worth it in the long term when you want to find them!

For example, this is the folder for July 2005. There were several event where I took pictures such as a wedding, or in the cases of folders labelled like ‘weekend 15-17, it’s pictures from that weekend. The remaining pictures are others that were taken that month that didn’t warrant specific categorization.

You will also notice that the pictures are named a certain way. The method I generally use is to name the file based on who is in the picture and/or where they are. Also, when I say picture, a short video taken with my phone would also be included in the same folder where pictures are stored.

Scanned Photos

As for scanned photos, the storage method is identical. If I have a collection of pictures from August of 1962, I will scan them and create the appropriate folder structure. In some cases where I don’t know the exact year, I have created folders such as ‘1960s’ and then keep the pictures there.

Other Categories of Photos

If you look at my year photo structure from earlier, there are 2 additional folders listed:

  • Family pictures
  • scan

In any way of storing pictures and videos, there are always exceptions. In my case, as part of my genealogy research, I also have collections of old photos that I don’t want to store in the year/month/event method. For these, I keep the ‘Family Pictures’ folder where I can store pictures based on other categories.

The ‘scan’ folder is where I keep scanned photos that haven’t yet been categorized and placed in folders.

As you develop your own storage system, you will find a system that works for you. The key recommendation is to keep all photos in a common folder structure as it makes backup and copying much easier.

Next time we will talk about making backup copies of your pictures and videos.Facebooktwitterredditpinterestlinkedinmail

Data Retention – what do you want to keep for the future?

A long time ago, when photography was only paper based, pictures were put in albums so that they would be protected and preserved for future generations. My grandparents labeled pictures and created albums, some of which are still in existence today. When you are doing your taxes, you keep at least 7 years worth of paperwork in case the government wants to give your tax return a second glance. University students who are writing a thesis might work on the document for several years and keep lots of research in the form of books, articles and notes. What do all of these items have in common? All are important items that have value for the owner and need to be protected and preserved – sometimes for different periods of time. This is known in the data protection business as retention. Retention is the amount of time that a document or item is to be saved. Let’s look at the types of items that we retain in more detail.

dance recital retention
dance recital – you’ll want to keep these photos

Digital Photographs

When you took that picture of your kid’s dance recital last week, did you think about how you would find it and look at it in 20 years? We live in at time where we are taking more pictures than ever before. This is thanks to the development of cameras in mobile phones – and the fact that these phones are always with us. Phones have a limited capacity, so one option that has become popular and easy, is to use a cloud based service like Apple’s iCloud or Google Photos to keep a growing picture collection. That is a great solution as long as these services continue to exist but what happens in 20 years if one of them either goes out of business or changes their business model to eliminate the storage of photos? While this seems unlikely for Apple and Google based on their business today, we cannot assume that anything is forever.

tax-financial-documents retention
don’t lose these documents unless you like paying tax penalties

Tax, financial and other documents

Lots of financial documents and statements are easily available online and can be downloaded to your computer as a PDF file. With the help of a scanner, all of these scattered bits of paper can be digitally stored together to provide a quick reference to financial statements or to bring together all documents required for tax season. It’s easy to store these files on your computer but what happens if your computer crashes? Try explaining to the tax department that you lost 10 years of data when your hard drive crashed. I don’t think that will excuse you from paying your taxes! Now, it’s possible that you don’t need to keep every document forever but copies of ownership for properties or life insurance policies need to be kept long term. Before determining a data retention strategy for your documents, you need to first categorize them based on how long they need to be kept in order to ensure that the right documents are kept for the right amount of time.

school assignment retention
better make sure your school assignments are frequently saved

Retention of school assignments and short term projects

These types of documents are very important but possibly for a shorter period of time. A student in high school working on a project might need the materials and final document for only the current school year or possibly until they graduate. Once the high school diploma is in hand, these items might be kept for sentimental reasons but they no longer have the same critical value. The same can be said for a 6 month work project. The raw materials to work on the report may or may not be important but the final document could be critical and may need to be retained longer term. The key point to take away for these types of documents is that they need to be protected during a shorter period of time, but during that time they are very important. In the case of a school project or PhD thesis, versions along the way have great value. Can you imagine working on the final draft of your thesis and then losing the file, only to discover that the one backup came from the first week you were working on it?

All of the above items are important digital data that must be protected – and all for different lengths of time, or as we said earlier, all have different retention times. Prioritizing your data allows the right protection method for each data type.Facebooktwitterredditpinterestlinkedinmail