Find Where Your Pictures are Stored – Windows and MacOS

I recently helped a friend set up backups on his computer. He uses a Mac and subscribes to iCloud. The level of subscription includes a few hundred GB of storage that more than enough covers his important documents and photos. I ensured that everything is stored in iCloud folders and we confirmed that all the files are showing up on a second Mac and also on his iPad. He also subscribes to another online backup service. As I frequently talk about, it’s important to have multiple types of backup so that you are protected in case something happens to one or more of the backup copies. It was no problem to point to the iCloud files on the computer to ensure that the backup service backed them up. The problem I had was finding the pictures that are managed by the Apple Photo Library.

The benefits of photo management software

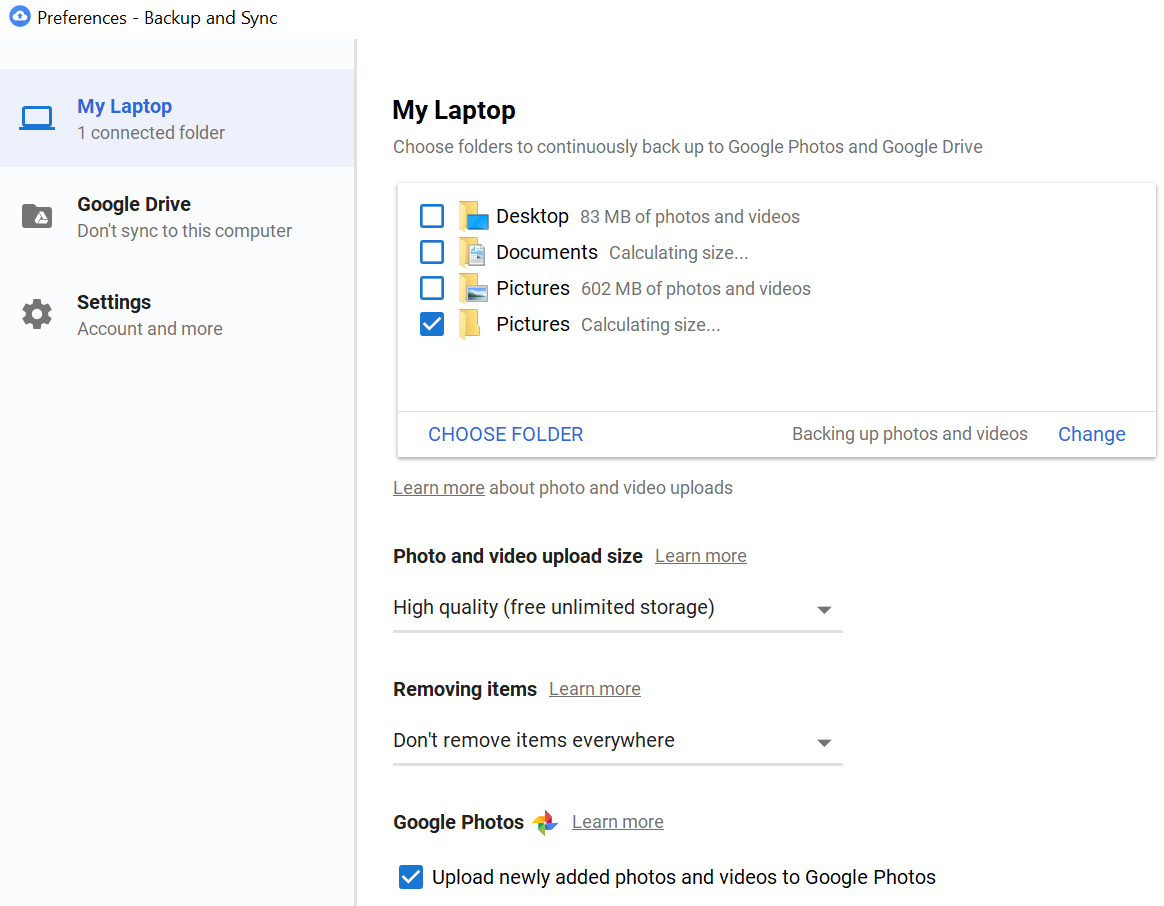
Apple Photos Library on MacOS is a great way to view and manage your photos. You can view them by date or put them into albums. There’s also integrated tools for doing minor photo editing. Another alternative is to keep the photos in a regular folder structure similar to what I have written about before. My example is from Windows but this can also be done on MacOS. The problem arises when you go to back up these photos that are managed by Apple Photos Library.

Just exactly where are those photo located?

I had a look at my friend’s computer to see where the photos are located in Apple Photos Library. The backup software that he uses, Zoolz, works by either setting it up to backup all photos, documents or specific files types or to browse for specific folders. I was able to browse to his iCloud document folders but could not find the Photo Library. Then I did a bit of digging around through the folder structure. I opened Finder and went to his home directory. I browsed through the folders and then I saw Photos Library

here is where the Photos Library shows up in the MacOS file system

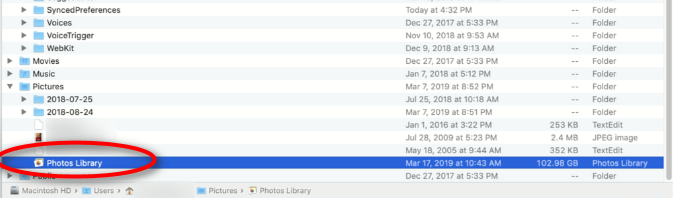
Double clicking on Photos Library just opens up the Photos Library program. By pressing CTRL and click, that opens the menu option where you can select Show Package Contents

This took me to the actual files and folders, looking quite similar to the system that I use for managing photos and videos.

Now I could copy or view any photo in the folder structure. But here is the big question. How can I access these photo folders from other software like Zoolz backup? I did some research and it looks like that since these are folders completely managed by Photos Library, your only option is to let iCloud back them up. For me, this goes against my practice of keeping multiple copies of important files such as photos and videos. Am I missing something? I there some other way to access these files, even from a back up only option? I understand that nothing except Photos Library should be able to change these folders.

If this is truly the case, then I cannot recommend using Apple Photos Library to anyone who is serious about effectively protecting their photos and videos. If you put these files in their own folder structure that you manage then you have control. In future, I will look at other options for managing photos and videos that does not involve Apple Photos Library. Or maybe there’s a way to sync files from Photos Library to another location. Do you have any suggestions for managing photos and videos on MacOS? If so, let me know in the comments.

Facebooktwitterredditpinterestlinkedinmail

Don’t let a disaster make your digital photos go down in the lake

I recently read this story on the news about a man who was ice fishing and disaster struck when accidentally dropped his phone into the hole he had drilled and the phone went down 27 feet to the bottom of the lake. On this phone he had a memory card that contained all of his digital photos from the past few years.

while small in size, memory cards can store thousands of your precious photos

No Backups in Sight

No one wants to lose their phone at the bottom of the lake. With proper backups, the worst part of this story should be the cost of replacing the phone. But that’s not the case here. He did not have a backup of the photos and there were some very precious ones on the memory card. The only way he was going to be able to retrieve these photos was to get the phone off the bottom of the lake, and then pray that the memory card was not damaged.

A Remarkable Rescue

Thankfully, this story has a happy ending. Through sheer determination and luck, the phone was retrieved from the bottom of the lake. When he properly dried off the memory card, all of the photos were able to be retrieved. While this story has a happy ending, it doesn’t usually happen this way. In many cases, the phone is not able to be retrieved from deep water or the memory card is damaged. We can’t always prevent destruction and damage to our devices but we can change the data recovery outcome

Preventing mobile device data loss

The obvious answer to preventing losing your pictures from your phone is backup. But how? Let’s look at a few ways that this unfortunate disaster could have been made less stressful.

The article doesn’t name exactly which phone but given the fact that the photos were on a memory card means it was likely an Android model as iPhones do not have the ability to have external memory cards.

Backup to a computer

With nearly any type of mobile phone, if you plug it into your computer, you can copy photos from either the internal memory or a memory card to your computer. From either a Mac or Windows the phone will appear as a folder where you can easily drag the photos to a folder on your computer.

plug your phone into your computer and back it up

There are programs available for free such as FreeFileSync that allow you to sync up photos from one folder to another or even from a device to your computer.

Cloud based backup

Using a service such as Google Photos or Microsoft OneDrive, you can back up your photos directly to a cloud service from your phone. The advantage to this option is that your photos will be backed up soon after they are taken. Most services will run by default when you are a WiFi network but can be set to back up over regular cellular service. If you choose to back up over cellular, make sure your data plan can handle this.

The best solution is to do more than one, so make sure you back up to your computer and use a cloud based backup. Accidents will happen so don’t make it more of a disaster with some preventative maintenance. No one wants to replace an expensive phone, but those memories stored on your phone are priceless.

Facebooktwitterredditpinterestlinkedinmail

Google Photos, great in the cloud, not so good from your computer

I recently read an article about Google Photos in the New York Times. There are numerous places online to store your photos and while I had tested out Google Photos a few years ago, I hadn’t continued to use it as an every day photo system. In this article, the author talked about the advancement of artificial intelligence and how accurately it was able to determine pictures of the same person. One of the main problems we face with taking so many digital pictures is that we can’t find them and end up not looking at them. Google has been working to solve this problem and their solution is to have you upload all your pictures and let Google figure out what is related, be it people, places or things.

This got me thinking about how I could use Google Photos along with the method I already use for storing and organizing my photos. I still prefer to have my master copy of photos and videos on my computer, stored by year, month and events. It’s backed up in numerous places, including offsite. What if I could have the best of both my system and Google? It was worth a try.

Syncing up to Google

I already have a Gmail account and I have uploaded numerous photos over the years, but more as standalone albums to share with people online.The first decision to make when putting your photos and videos in Google is cost. You can let Google compress your videos and photos and then there is unlimited storage, but if you keep them at their original size then you’ll have to buy space at whatever the current rates are.

I looked up the compressed rates and they’re pretty reasonable – 16 megapixel for photos and 1080p for videos. If you use this as secondary storage, then it’s not an issue, and for most cases, these are good enough quality unless you are doing professional photo or videos work.

Setting up the sync

First, before doing anything I made sure that my master copy of photos was backed up. I have a regular process where the external hard drive of my photos is backed up to network hard drives in my house. Once this was done, I continued.

I installed Backup and Sync from Google. It walks you through the steps for installation including deciding what you want to sync and what not to sync.

A few items to note in the screenshot above:

  • I clicked on Choose Folder and picked my external drive where I keep photos. That is the box that is checked on the list of folders
  • I chose the High quality, free unlimited storage option
  • I set it to don’t remove items, so that it would upload only and not affect files on my computer

I then started watching as photos and videos started getting uploaded.

Note that you can click on the Google Sync icon in the taskbar, shown above with a red circle.

Something isn’t right

As I watched the screen scroll with photos and videos being uploaded, I occasionally saw the word ‘deleted’ or ‘failed’. After awhile, it stopped and couldn’t sync a whole bunch of files. I knew it couldn’t be close to done as I have over 50,000 photos and videos! I use a program called FreeFileSync to back up my photos and videos to another hard drive so I used it in reverse to show me what files were on the backed up hard drive and not on my primary one. It showed about 60 pictures that somehow got deleted. That concerns me as I specifically chose the option to NOT delete files. I was able to put everything back because of the backup.

I am still experimenting with the software but at this time I cannot recommend Google Backup and Sync for anyone to use with their main copy of photos and videos. If you want to get your photos and videos into Google Photos, I would suggest something along the following lines:

  • Copy all of your photos to a temporary location
  • Install Google Backup and Sync
  • Point Google Backup and Sync to the temporary location
  • In future, install the app for your phone and let it sync from the phone directly

Facebooktwitterredditpinterestlinkedinmail

When the cloud goes down

Last week my mom got a new iPhone so this was a perfect test for her to see how well iCloud backs up all her data and can easily restore it a new phone. When we went to restore her iCloud backup to the new phone, it showed that there wasn’t one. I checked closer and discovered that she had run out of space in her iCloud account, even though she had upgraded it from the free 5 GB to 50 GB of storage space. This ended up as a positive, as I saw that my dad also had upgraded to 50 GB and if they pooled their resources, they could share a 200 GB storage plan for about the same cost. They made the switch and then I kicked off a backup from her old phone.

The first lesson – check your backups

Once you have a backup system in place, make sure to check it regularly to ensure that your precious data is actually getting backed up. There’s no point in paying for something that isn’t working properly.

Waiting for the backup to continue

So before she could use her new phone, the backup had to complete on the old phone. I suspected it would take into the night so I suggested she let it run and then try the restore in the morning. Later in the evening the backup wouldn’t run at all and it showed that she had 0 GB available in her plan. Something had gone very strange in her account. At this point I decided to check my iCloud account and sure enough, it wasn’t working either. It was then that I discovered this very helpful status site that Apple  runs that lets you know about problems within iCloud:

https://www.apple.com/ca/support/systemstatus/

By the morning iCloud was up and running and the backup finished. My mom was able to successfully restore her phone and everything worked as expected.

The second lesson – it may not only be you having a problem

Sites like iCloud provide helpful status information so that you can determine if the problem is on your side or Apple. By knowing there is an issue with Apple, you can stop troubleshooting and wait for the problem to be resolved.

The downside of the cloud

This was a short outage of iCloud so it didn’t really affect my mom’s ability to use her phone. What if she needed some data that was in iCloud for a meeting? Several hours of outage might just be too much. We have to strike a balance when using cloud services. The are very convenient to be able to access from anywhere and are likely more stable than hardware we have in our house. Still, if you need a file and it’s on your computer, it’s likely you’ll be able to access it.

The compromise

Evaluate your files and data to determine how critical each is and what are the implications of losing access temporarily. If you have an important presentation, put that PowerPoint file in the cloud and also on a USB stick. If you can’t access some family pictures for a few hours, that may not have much impact. The cloud has become an invaluable tool for data access everywhere, but some advance planning will ensure that you’re covered when the cloud is taking a break.Facebooktwitterredditpinterestlinkedinmail

The Case of the Failed Hard Drive and the Files left Behind

When we think about data protection and backup, it’s easier to get an idea of what it’s all about if we can see an example in real life. Here is the first of hopefully a number of case studies of data loss and how to handle it.

Elaine is a retired social worker. She has used a computer for many years, mostly in her working life and also for keeping journals writing memoirs. Elaine is also very artistic and enjoys creating greeting cards for family and friends using her computer.

Several months ago, Elaine’s computer starting making loud noises and then Windows wouldn’t start. Since the computer was 10 years old, I advised her that this was a good time to look at getting a new one. Even if the computer didn’t start properly, we could could still possibly retrieve some or all of her files from the old one. Elaine ended up buying a new laptop and was able to get it up and running. Since she had subscribed to Dropbox a few years ago, most of her files were right there waiting once it was installed. But not all files – more about that soon.

The Diagnosis

Elaine brought over both her old and new laptops. I started up the old one and sure enough heard the fan motor loudly humming away. Windows did not start up so I was able to get to System Recovery. I chose Startup Repair.

From here it ran a scan trying desperately to find an installation of Windows to fix. Unfortunately, it came up empty, as you can see from the image below. If there were an installation of Windows to repair, it would have shown up in the list.

This meant that there wasn’t much to do on this computer. There are recovery tools that can be run that are booted up from a USB stick or a CD but I decided to try something else – take out the hard drive and attempt recovery from another computer.

I highly recommend keeping one or more extra hard drive enclosures in your computer supplies. These allow you to pop your hard drive into a box that turns it into an external hard drive. These usually come with USB cables so you can connect it up to any computer.

The Search for Files

Once connected, it didn’t look good for Elaine’s hard drive. I ran Windows Disk Management and looked at the hard drives listed. The following image shows a bunch of healthy, normal disk partitions. The one shown in red is RAW and this means that data corruption has occurred. Built-in tools for Windows will not let you look at or retrieve files from RAW partitions.

I did some research and found several programs that claim to recover files from RAW partitions. Several have free trials that will show you what files can be recovered but you have to pay to recover them. MiniTool Power Data Recovery will not only scan a RAW drive and show you what files it can recover but it will recover up to 1 GB for free. This is very helpful if you have a small amount of data to recover or want to test the software first to prove if it will work.

The Recovery

When I installed this software, it scanned the drive and came up with a many folders that it could recover. Elaine spotted several folders that weren’t in Dropbox, and therefore weren’t on her new computer. Since Elaine had less than 1 GB of data to recovery the free version of MiniTool was sufficient. Now that I have seen the program in action, I would recommend either the free or full version to anyone requiring data recovery.

Additional Data Loss Prevention

Elaine was very pleased when I found her numerous journal entry files and memoirs. She had saved all of these to folders not in Dropbox, therefore they were never backed up. Elaine had already invested in the paid version of Dropbox that provides 1 TB of data. I relocated all of her files to Dropbox and then reviewed where all the files were located. I then launched Word which is the primary program she uses for her writing. By default, Word saves its files in your documents folder. I changed this to Dropbox to ensure that all future created files are automatically saved in Dropbox. This should be repeated in all programs.

Elaine also brought over her digital camera as she wasn’t sure how to transfer files from a camera to Windows 10. I showed her how to put the SD card from the camera into the computer.

I then launched Windows Explorer and went through the process to import pictures from a memory card. The key take away here was not to use the default settings. I set the destination for copying the pictures and videos to Elaine’s Dropbox folders. This way the pictures would go directly to Dropbox. Elaine mentioned that she wanted to use the SD card as a backup for her pictures. I highly recommend against this. First of all, if you always keep your pictures on the memory card, how will you know what you have and have not copied to the computer? This makes for lots of duplicate photos.

Second, think of the memory card as your temporary storage for pictures. By emptying out frequently, you will always have lots of space for taking more pictures and videos. Of course, all of this assumes you are using a traditional digital camera and not a Smartphone.

In Conclusion

Elaine now has a new computer that contains all of her files. She was very fortunate that the files on her old computer were able to be recovered. Professional recovery services charge hundreds or even thousands of dollars for recovery. Software like MiniTool doesn’t work in every case so it’s helpful to try it first before engaging with data recovery professionals. By properly setting up save locations and having a proper system for using Dropbox or another cloud based service, you can make a computer failure more of a minor annoyance where you have to replace the computer instead of a disaster where your critical files are gone forever. Like the old cliche says, an ounce of prevention is worth a pound of cure!Facebooktwitterredditpinterestlinkedinmail

I deleted all of my vacations pictures by mistake

We recently returned from a fabulous week touring in Nova Scotia and Prince Edward Island. Along the way I took many pictures and videos of the beautiful sites to be found along the way. Without getting into a whole travel review, I will say that if you haven’t driven the Cabot  Trail, go and see it!

When I arrived home, I had a folder with numerous pictures and videos that were combined from mine and our friend’s camera. I was doing various manipulations and then at some point I somehow managed to delete the entire folder of pictures and videos!

Even though this happened, I took a deep breath and then copied back the files from my Network Attached Storage (NAS). I talked about NAS in a previous post. Backup and data protection isn’t only about protecting for loss in the future when something fails. It also applies, maybe even more frequently to protect us from our own mistakes!

When you are transferring photos from either your phone or digital camera, following these steps will ensure that you prevent a future loss of your data:

  1. Copy the pictures and/or videos to a folder in your computer
  2. Immediately make a backup copy to another location, preferably one that is not on your computer
  3. Do whatever editing or modifications you want, knowing that your original files are backed up to another location

When it comes to human errors in computers, it’s not a case of if it will happen but when. By taking preventative measures with your most important files, you can ensure that you don’t delete your vacation pictures before you’ve had a chance to properly protect them.

Facebooktwitterredditpinterestlinkedinmail

Don’t Forget about Maintenance

I listened to an episode of one of my favourite podcasts, Freakonomics, recently. This one was entitled In Praise of Maintenance. The idea here is that as a society, we always want to build and create new things but we neglect the maintenance of the structures and creations that we already have. Governments talk about building new highways and public transit, but it’s not so exciting to provide funding to fix existing roads or subway tracks. The same can be said be said for our own digital life.

plumber holding wrench

Computer and smartphone manufacturers market to us constantly to upgrade to the latest and greatest devices. High resolution screens, fast processors and huge hard drives are very enticing as compared to our ‘old’ two year old computers! If we aren’t taking proper care of our data, then buying new doesn’t solve the existing problems that effective maintenance would alleviate.

In previous posts, I’ve talked a lot about being mindful of where your data resides and ensuring that it’s backed up. With regular maintenance of our data, we can have our cake and eat it too:

  • we ensure that all of our data is safe and protected
  • we can get that exciting new computer or smartphone and be confident that all of our data will seamlessly move over to it

So what kind of maintenance should we regularly be doing? Here’s a few suggestions:

  • Check that backups are actually running on schedule
  • Do test restores to ensure that we can actually get back our data
  • Check how much free space is on our hard drives and online storage to ensure there is enough room for future growth
  • Evaluate if our existing backup needs are still appropriate, such as health of external hard drives and is our online backup service still the most cost effective
  • Do we have new types of data that we haven’t been backing up? This could be files related to a new project or old family videos that were recently converted to digital format

There’s many more that could apply. What types of maintenance do you need to do with your digital data?

Leave your comments here or fill out our survey / backup assessment.Facebooktwitterredditpinterestlinkedinmail

Instant Recovery from a Hard Drive Crash

Imagine this nightmare… you’re working on a large business report and with just a few more finishing touches to go, and you suffer a hard drive crash. Everything is gone and you have to explain to your client why you won’t have the report ready. Wouldn’t it be great to have near instantaneous recovery from this sort of disaster?

explosion over beach

With sufficient preparation you can recover and get back to work with either minimal or no loss of data. We need to change our view of our computers as a single point of failure / critical device to that of a simple appliance. If your coffee maker breaks, you might not be happy to have to replace it, but you can go out and buy a cup of coffee, get a new coffee maker and be back up and running very soon. By treating your computer as a replaceable and disposable device, it changes the way that you are able to work.

Separate your data from your computer

Right now you may have a bunch of documents and spreadsheets in a folder. Another folder has pictures and videos while your email has been downloading and getting stored on your computer for years. In previous posts I talked about moving your email to the cloud and I talked about the topic of cloud based files too.

Using Dropbox, OneDrive or Google Drive allows all of your critical files to be kept both on your computer and in the cloud. Going back to the earlier example, if your report is stored in Dropbox then every time you save the file it gets uploaded to Dropbox. With Google Docs, it is automatically saved every few minutes. If you are on a plane or somewhere that you don’t have internet access, sync services like Dropbox let you keep working normally and then will sync up once it has an internet connection.

Email if kept in Gmail or Outlook.com means that you don’t have a dependency on your computer. You can still have it download a copy that stays in sync with the online version.

With prices for online storage coming down, you can pay about $100 a year for 1 TB or more of storage. This can store most picture and document collections so that all of your precious memories are securely backed up online.

Making an Instant Recovery from a Crash

So now that you’ve got everything protected, what do you do when disaster strikes and your computer crash makes working impossible? The price of computers has come down substantially. Even a very basic laptop can be had for under $300. I have discovered an excellent source of high quality and powerful computers is the refurbished market. One example is Dell. Numerous companies lease computers for 3 or 4 years at a time. Once the lease is over, the computers go back to the manufacturer. In the case of Dell, they have an online store to sell these. Check with your country, in Canada it is dellrefurbished.ca. I have bought several laptops and desktops from Dell Refurbished and have been very pleased with the results. As an added bonus, they have sales several times a year so be sure to do an online search for “Dell Refurbished coupon code” to save up to 50%.

So where am I going with this? If you buy a refurbished computer, then you have a standby ready to go at a moment’s notice. If it’s a laptop, you can order it, set it up with what you need, such as Dropbox and your favourite software. Put it away and then you have it ready to go. As far as insurance goes, this is a good option, especially if your livelihood relies on having a working computer.

life insurance

With computers, it’s not a case of if it will fail but when. Having a strategy where you don’t have to think about protecting your files from a crash is the way to a fast recovery. We buy insurance for our lives, cars and our health, so with the same way of thinking, we can insure our data.Facebooktwitterredditpinterestlinkedinmail

How I backup and store multiple copies of my pictures and videos

In a previous post, I talked about a folder structure for storing pictures and videos. Now let’s look at the methods I use to do the following:

  • create additional copies of pictures and videos at home
  • backup pictures and videos online

The primary copy of my pictures and videos is located on an external hard drive that is generally connected to my laptop computer. This makes it easy to bring it anywhere but if something were to happen to the hard drive, such as losing it or having it fail, I would lose everything. That is why I have multiple copies.

Copy to another hard drive at home

A few years ago, I set up a device similar to this one. It is a Network Attached Storage (NAS) device. This is a device containing a few hard drives that does not require a computer. It provides hard drive storage space on your existing network.

During the writing of this article, I reviewed the settings on my NAS. When I logged in to check it, I discovered that one of the hard drives in the NAS had failed. This NAS device was configured with 2 hard drives, each 2 TB in size. The NAS is set up as RAID 1, which means that the hard drives are set up to be clones of each other. This is transparent to the user – when you copy files, it keeps the drives in sync. It was just a matter of purchasing a new hard drive, telling the NAS device to detect it, and then it automatically copied all of the data from the good drive to the new one. Having a system like this gives you extra protection from failure. With hard drives, it isn’t a matter of if the drive will fail – it’s when it will fail.

Below is the display on my NAS device showing the failed drive.

It is important to note that I should have known about this failure. This NAS device is set up so it can send emails to notify about problems like this. My email password had changed and I did not update the NAS device. Keeping on top of dependencies like this is important!

Keeping the NAS device in sync

I use a program called FreeFileSync to sync up my pictures and videos from the external hard drive connected to my computer to the NAS device on my home network. This can be either run on demand or scheduled to run every so often. What I like about a sync program is that it only copies what has changed, not the thousands and thousands of pictures that I have. The combination of my external hard drive and backup to the NAS drive means that I don’t have to worry if while I’m out that something happens to my photos and videos.

a screenshot of FreeFileSync

Online Backup

But what if the NAS drive fails? That’s why we need to backup away from the primary location, which in my case is my home. There are many different online backup services and I’ll have more to say about how to choose and what to choose in a future posting.Facebooktwitterredditpinterestlinkedinmail

World Backup Day 2018

If you went on Google this past weekend and searched for “world backup day”, you would find lots of talk about backup. Who started this? To be honest, I’m not really sure, but it doesn’t matter – it’s a really good reminder to make sure that you are backing up your data.

According to www.worldbackupday.com, many people aren’t backing up properly:

If you aren’t backing up at all, there are 2 things you can do to get started:

  1. Choose an online backup provider and start backing up
  2. Buy an external hard drive and start backing up

Ideally, you would do both of the above.

Cost of Hard Drive Storage Over Time


The cost of hard drives per gigabyte has dropped dramatically over time. I recently had to purchase a new hard drive for home backups and I was able to purchase a 4 TB hard drive for $160. You can get these even cheaper but I needed these for type of systems known as Network Attached Storage (NAS). More about that in a future post.

At this price, it cost 4 cents per gigabyte of storage. Let’s compare this over time. I found this chart at www.mkomo.com/cost-per-gigabyte-update

This shows how the cost per gigabyte has gone from over 1 million dollars in 1980 to 4 cents now in 2018. It wasn’t even possible to buy a hard drive at 4 TB in 1980, but if you could, it would have cost 4 billion dollars!

The point I’m making is that it has never been so cost effective to buy so much hard drive storage. If you have tons of videos, pictures, music and documents, you can buy more than one hard drive for backup plus a subscription to an online backup service.

Take the Plunge and Start Backing Up

Picture yourself in one year from now on World Backup Day 2019. You’ve been backing up all your data so you feel calm and relaxed, knowing that you’re protected from the dangers of ransomware and failed hard drives. If you’re feeling overwhelmed by the options, remember this: there can never be too many forms of backup. If you change your mind after 6 months and want to do something else, that’s fine, add it to your backup routine. Backup is peace of mind so start doing it today!Facebooktwitterredditpinterestlinkedinmail