My daughter started in grade 9 at Westmount Collegiate Institute in Thornhill in September 2019. Trying to find the right information to connect to school wifi proved to be quite difficult. There is nothing online that tells you how, or if it’s there they’ve hidden it really well. My son has been in the York Region school system for a few years and must have somehow figured out how to connect as his Chromebook connects. We ended up going to the school with both Chromebooks and I checked the settings of the one that does connect and entered the right information and it worked.
The directions below are for a Chromebook but should work for any Windows or Mac too. The field names may be different.
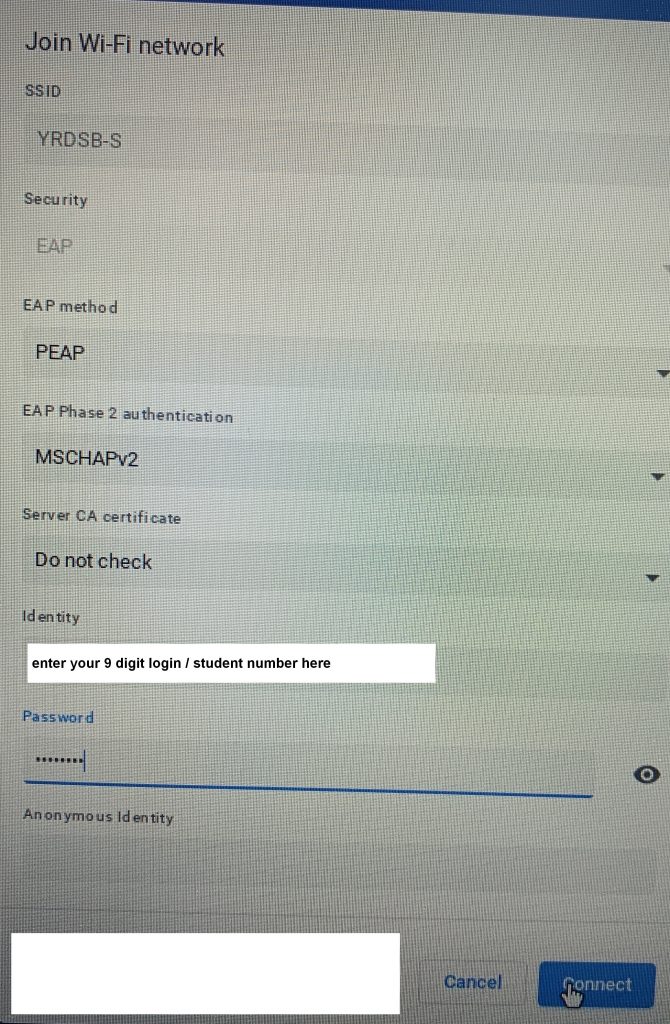
To save others the same trouble we went through, here is what you need to fill out on the wifi settings.
First, make sure to connect to the YRDSB-S wifi network.
Choose EAP security, EAP method PEAP.
You may be able to choose automatic for EAP Phase 2 authentication but I saw that it used MSCHAPv2 so selected that.
Do not check for Server CA certificate
Identity is your 9 digit student number
Password you should already have for Google Classroom
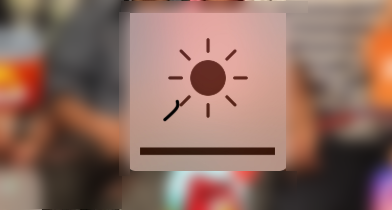
I had a call from my mom while she was a passenger in a car for a long trip. She brought her iPad with her, loaded with movies to watch. For some reason, the brightness kept dropping, even when she manually moved it back up. She couldn’t figure out why and when she called me, I couldn’t figure it out either.
I asked her to send me a screenshot so I could see what was going on. This is what she sent:
brightness icon shows up on iPad screen
I searched some discussion forums and found some mentions of auto brightness but that didn’t fix it. Then someone mentioned a bluetooth keyboard whose keys were accidentally pressed. So I called her back and asked if her bluetooth keyboard was possibly in her bag and turned on. Yes! It was on and this keyboard has keys for controlling brightness. It seems that the ‘lower brightness’ button was being held down. As soon as she turned it off, all returned to normal.
I hope that someone finds this post when dealing with a similar annoying issue.
As the family genealogist, I have regularly experienced the thrill of coming across a box full of photographs. It’s a surprise venture into the unknown to go through a stack of picture that may or may not have to do with each other. As the quantities of pictures get larger, the thrill starts to wear off as I think to myself that it would be much easier to deal with these pictures if they were in some kind of order. Compare this to coming across carefully organized and planned photo albums that have written comments and descriptions of who’s who. In the paper based world, it makes sense to put photos in albums or papers into labelled file folders. When it comes to the digital world, the same situation doesn’t necessarily apply.
a stack of photos may be fun to look through but can take forever to sort!
The benefits of storing files in folders
I’ve talked before about my method for organizing photos into folders. This gives structure and and easier ability to find photos. Combined with my method for naming and tagging photos, it makes finding that proverbial needle in a haystack a bit easier to find. This can be applied further to any types of folders, for example I keep folders of bills and statements sorted by company types, ie credit card, insurance, hydro, etc. If I want to find my Mastercard bill from 3 years ago, it’s easy enough to go through my folder structure to find the file that I know will be named something like ‘2016-03 Mastercard.pdf’.
I do the same thing with email. Several years ago I moved my email to Gmail. Gmail uses a structure for folders that they call labels. What this means is that you tag emails with a label name but you view them like folders. If you tag an email with more than one label, it will then appear to be in more than one folder. But if you delete it from a folder/label, it’s gone as there is really only one copy.
those paper file folders did make finding information a bit easier
In the early days of computing, it made sense to apply structures from the real world into the computer world. Folders in your filing cabinet became folders in your computer. Photo albums also can easily be structured into a computer in the form of folders. I was talking this week with an older friend who agreed with me that this structure makes a lot of sense to him, but his son doesn’t necessarily agree.
An argument for one big free-for-all folder
Part of the power of computers is that they can do the hard work of sorting and searching. Imagine picking up a big box of photos and being able to find the one you want in seconds. That’s what computers have done for the digital world. Let’s look at how this might work in a few examples where we eliminate the use of folders.
Email with no folders
Anyone who has used Google knows at what speed search results are returned. Gmail and many other online email systems use this same concept to allow you to search your personal, private email. Although I choose to label all of my emails (into folders), I could leave them all in the inbox. When I want to find a message, I can just search for any words in it and/or the sender and the results will be returned as in a Google search.
Digital photos all in one big virtual box
Let’s say I put all of my thousands of digital photos into one folder. I could still search for them by date as every digital photo taken has the time and date embedded in the file. This isn’t the case for scanned photos but there is software that will allow you to set this information. Google Photos and other similar photo sharing services don’t use folders. You just upload all your pictures and Google lets you search and organize them into albums.
Files in one big folder
Going back to the example of the Mastercard statement. If I name my files in meaningful ways then I can search for them easily. Let’s say I had a folder with these files in it:
2016-03_Mastercard_statement.pdf
2014-03_hydro_statement.pdf
204-02_letter_to_joe.doc
Searching the folders for any words that I know will appear in the name or maybe even in the content of the document will find the file. This would mean I could keep many unrelated documents in the same folder but still be able to find them.
So which way is better, folders or not?
It really depends on your way of thinking. On one hand, the folder structure is based on the physical world of folders and albums. If you are able to find what you want with searching then having less structure could make sense. Personally, I prefer more folders that allow me to browse when I want, but since all my files are searchable within the computer I can still do both. If I’m searching for copy of a specific statement from 5 years ago, I know exactly which folder to look in. If I want to find a letter that I wrote to a friend at some unknown time, I can search their name in my folders to find it.
Without some level of organization, certain data will drop into a virtual ‘black hole’ never to be found. Think about it this way. If you had 10,000 photos and put them all, unlabeled into a single folder, imaging how hard it would be to pinpoint a specific one. By putting some organization into your files structures, you make it easier to find what you are looking for.
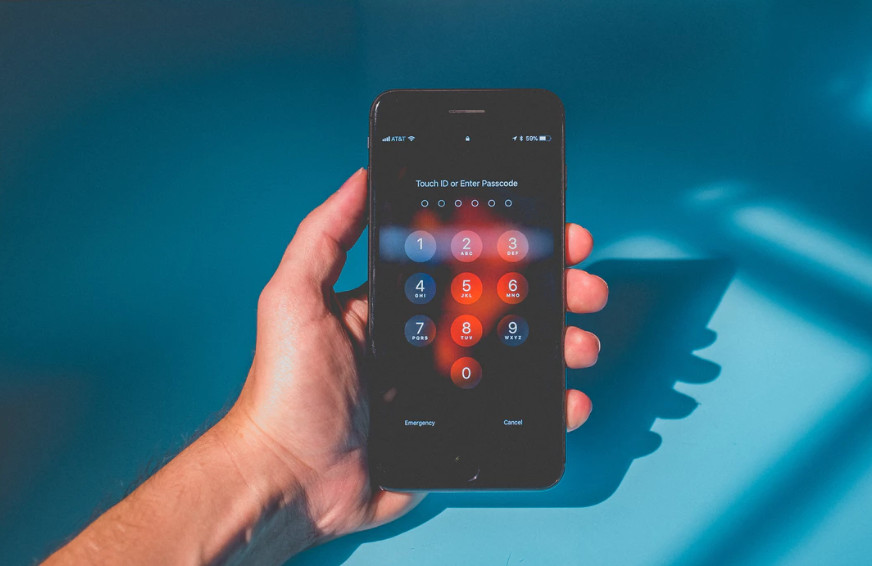
My sister called me recently to ask if I could help her friend’s father. It seems that due to illness and memory loss, he forgot his password for his Windows, Android phone and e-mail. I offered to go over and help to see what could be done to get him back to all of these important systems.
Have you ever forgotten your smart phone passcode?
Passwords, passwords everywhere
We rely so much on our digital systems today and most are protected by user names and passwords. Keeping track of them is critical to gaining access to devices and accounts and also it is important to have a way to share this information in case of illness or death. No one wants to think about these until it is usually too late, so some prevention is required. There are two primary methods for keeping track of passwords:
Paper based, such as notebooks
Digital based such as password managers that run on a computer or mobile device. These generally are encrypted programs that only require you remember one password to get into the system that contains all of the other ones
Neither of the above methods is better or worse, it really depends on your needs and comfort with using digital systems to track important information.
The forgotten passwords
Back to our story about forgetting passwords. I prepared in advance by creating by USB and CD based password recovery using this free program at http://pogostick.net/~pnh/ntpasswd/. I went over to the couple’s apartment expecting that I wouldn’t be able to log into the computer. It turned out that there was an administrator account without a password but three other user accounts that he could not log into. Using tools built into Windows 10, I was able to reset the three accounts and returned access to the computer.
The next step was to reset the email account and with that, I hoped that it would be able to be used to unlock the Android phone. We contacted the internet provider and after explaining who we were, they very kind support technician reset the password and then I reset it again to something that this man could remember. I then attempted to find the account that was used to set up the Android phone. After numerous attempts at looking up this information, it turned out that he had never set up the phone to sync up to an online account. With this done, we would have been able to remotely unlock the phone. This mean additional techniques had to be investigated.
Unlocking an Android phone after forgetting the password
I did some research online and came up with various methods for removing the forgotten passcode to an Android phone. One type of method involves running various commands to a phone plugged in to your computer. The other are some commercial software that can be purchased for around $50 that will do the job for you.
I looked at the list of supported devices with this software and discovered that this newer phone, the Samsung Galaxy S7 is not supported. I decided not to experiment as this could completely destroy the software on the phone. I looked up some other methods but none of them appeared to be safe. I contacted a few companies that claim to be able to unlock a forgotten password. One method involves attaching directly to the motherboard and trying every number combination. Usually, if you try this option you will have to wait 30 seconds or more between attempts. This company would charge about $400 to do this.
Given that information, the phone owner decided to think about it. It’s more likely that the data on the phone isn’t worth the money.
End Result
So now he has his computer back and other family members know the password. The phone is likely going to be wiped out and then he’ll have it again. The key lesson here is in prevention. Keep track of your passwords and sign up with services such as Apple iCloud or register an Android phone with Google so that you have recovery options. It may be a cliche but it is true – an ounce of prevention is worth a pound of cure, or in this case, many dollars!
I recently helped a friend set up backups on his computer. He uses a Mac and subscribes to iCloud. The level of subscription includes a few hundred GB of storage that more than enough covers his important documents and photos. I ensured that everything is stored in iCloud folders and we confirmed that all the files are showing up on a second Mac and also on his iPad. He also subscribes to another online backup service. As I frequently talk about, it’s important to have multiple types of backup so that you are protected in case something happens to one or more of the backup copies. It was no problem to point to the iCloud files on the computer to ensure that the backup service backed them up. The problem I had was finding the pictures that are managed by the Apple Photo Library.
The benefits of photo management software
Apple Photos Library on MacOS is a great way to view and manage your photos. You can view them by date or put them into albums. There’s also integrated tools for doing minor photo editing. Another alternative is to keep the photos in a regular folder structure similar to what I have written about before. My example is from Windows but this can also be done on MacOS. The problem arises when you go to back up these photos that are managed by Apple Photos Library.
Just exactly where are those photo located?
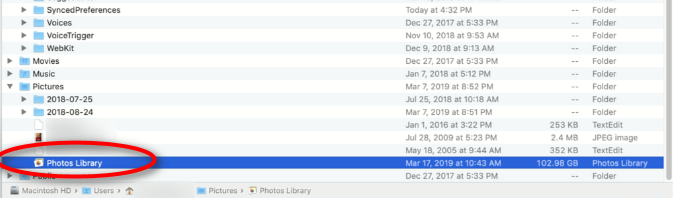
I had a look at my friend’s computer to see where the photos are located in Apple Photos Library. The backup software that he uses, Zoolz, works by either setting it up to backup all photos, documents or specific files types or to browse for specific folders. I was able to browse to his iCloud document folders but could not find the Photo Library. Then I did a bit of digging around through the folder structure. I opened Finder and went to his home directory. I browsed through the folders and then I saw Photos Library
here is where the Photos Library shows up in the MacOS file system
Double clicking on Photos Library just opens up the Photos Library program. By pressing CTRL and click, that opens the menu option where you can select Show Package Contents
This took me to the actual files and folders, looking quite similar to the system that I use for managing photos and videos.
Now I could copy or view any photo in the folder structure. But here is the big question. How can I access these photo folders from other software like Zoolz backup? I did some research and it looks like that since these are folders completely managed by Photos Library, your only option is to let iCloud back them up. For me, this goes against my practice of keeping multiple copies of important files such as photos and videos. Am I missing something? I there some other way to access these files, even from a back up only option? I understand that nothing except Photos Library should be able to change these folders.
If this is truly the case, then I cannot recommend using Apple Photos Library to anyone who is serious about effectively protecting their photos and videos. If you put these files in their own folder structure that you manage then you have control. In future, I will look at other options for managing photos and videos that does not involve Apple Photos Library. Or maybe there’s a way to sync files from Photos Library to another location. Do you have any suggestions for managing photos and videos on MacOS? If so, let me know in the comments.
For the past number of years, I have used Dropbox as my primary cloud storage for my most important and frequently used files. Even though Dropbox only gives you 2 GB of free space, I was able to earn more free space by referring friends and family. This had brought me to a total of 22 GB of space. This was plenty of space to store documents and other files. I have Dropbox installed on several computers and mobile devices and it’s all kept in sync between them. Recently Dropbox made a change to their free tier allowing only 3 devices to be used. They did say that current users can keep their existing devices but I knew that over time this would eventually become an issue for me. Since I subscribe to Microsoft Office 365, I decided that this was the right time to move all of my Dropbox files to OneDrive.
Microsoft Office 365 is a way to license the full office suite, ie Word, Excel and others. You pay an annual fee to use these services. For our family, the 5 user license makes sense. What really makes this a solid deal is the inclusion of OneDrive accounts for each user, each with 1 TB of storage space. I had been using OneDrive as one of my photo and video backup locations, but now decided to take the leap and move all of my cloud storage there.
Moving My Files
I decided to move files a bit at a time to see that they were properly syncing up in OneDrive. I have only a few folders in the root of my Dropbox account, such as:
Archives (genealogy data)
Current Files
Documents (bills and statements)
I decided to move one and watch what happened. The process worked flawlessly and I quickly saw the files appear in my online OneDrive account. I made sure that all computers I use with Dropbox and OneDrive were powered on so that each would get synced up as I went through the moving process. I also checked my other online backup service to make sure that all of the Dropbox files were backed up in case of any issues.
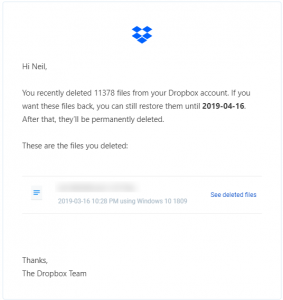
A Warning from Dropbox
One of the more malicious viruses out there is ransomware. Your files can get infected if you open an attachment that causes all files to be overwritten with garbage data. Some of these give you an option to pay a ridiculous “ransom” to get your files back. One of the warning signs would be that thousands of your files cloud service suddenly get changed or deleted. Well, I discovered that Dropbox checks for this. Shortly after moving the first set of files, I received this email from Dropbox
a helpful warning from Dropbox
In this case, I knew that these files had been deleted from my Dropbox account since I moved them to OneDrive. It is reassuring to know that if this had been a real virus, I could have easily retrieved all of these files. I did some research and determined that OneDrive also has ransomware protection.
Knowing that my files are further protected against a virus by being in OneDrive or Dropbox is additional reassurance that they are kept safe. Like I’ve said before, this type of service, coupled with backups at home and to other online services will help to keep your files safe, even if bad things happen to them.
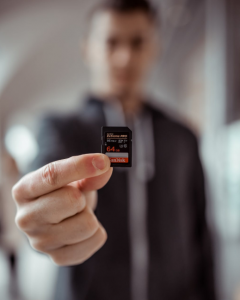
I recently read this story on the news about a man who was ice fishing and disaster struck when accidentally dropped his phone into the hole he had drilled and the phone went down 27 feet to the bottom of the lake. On this phone he had a memory card that contained all of his digital photos from the past few years.
while small in size, memory cards can store thousands of your precious photos
No Backups in Sight
No one wants to lose their phone at the bottom of the lake. With proper backups, the worst part of this story should be the cost of replacing the phone. But that’s not the case here. He did not have a backup of the photos and there were some very precious ones on the memory card. The only way he was going to be able to retrieve these photos was to get the phone off the bottom of the lake, and then pray that the memory card was not damaged.
A Remarkable Rescue
Thankfully, this story has a happy ending. Through sheer determination and luck, the phone was retrieved from the bottom of the lake. When he properly dried off the memory card, all of the photos were able to be retrieved. While this story has a happy ending, it doesn’t usually happen this way. In many cases, the phone is not able to be retrieved from deep water or the memory card is damaged. We can’t always prevent destruction and damage to our devices but we can change the data recovery outcome
Preventing mobile device data loss
The obvious answer to preventing losing your pictures from your phone is backup. But how? Let’s look at a few ways that this unfortunate disaster could have been made less stressful.
The article doesn’t name exactly which phone but given the fact that the photos were on a memory card means it was likely an Android model as iPhones do not have the ability to have external memory cards.
Backup to a computer
With nearly any type of mobile phone, if you plug it into your computer, you can copy photos from either the internal memory or a memory card to your computer. From either a Mac or Windows the phone will appear as a folder where you can easily drag the photos to a folder on your computer.
plug your phone into your computer and back it up
There are programs available for free such as FreeFileSync that allow you to sync up photos from one folder to another or even from a device to your computer.
Cloud based backup
Using a service such as Google Photos or Microsoft OneDrive, you can back up your photos directly to a cloud service from your phone. The advantage to this option is that your photos will be backed up soon after they are taken. Most services will run by default when you are a WiFi network but can be set to back up over regular cellular service. If you choose to back up over cellular, make sure your data plan can handle this.
The best solution is to do more than one, so make sure you back up to your computer and use a cloud based backup. Accidents will happen so don’t make it more of a disaster with some preventative maintenance. No one wants to replace an expensive phone, but those memories stored on your phone are priceless.
The topic of this post was inspired by the passing of a close family friend. Nobody likes to have difficult conversations about what to do when the worst happens, but the reality is that not having these conversations can make a bad time even worse. So much of our life is managed by digital bits therefore when someone else has to manage it, they need to know where to find everything and how to access it.
It doesn’t just have to be a a death that requires someone else to handle your affairs. A short term illness where you are incapacitated may necessitate a power of attorney to pay your bills and manage other elements of your life. Having the difficult yet important conversations beforehand are necessary so that your family can continue without the extra hardship of piecing together your financial affairs.
Our friend suffered through numerous illnesses over many years. As his condition worsened, he spoke with his daughter and went through everything – bank accounts, insurance policies, investments, etc. By showing her where the paper work was located and how to access the files on his computer, she could deal with the estate after his death. It’s hard enough emotionally to handle the loss of a close family member. We can’t control what happens through illness and death, but we can control how easy or difficult we make it for our family members who have to continue on.
Backing up the computer – make it Virtual
I was approached by the family to ask how they could effectively back up our friend’s laptop after he died. It was several years old and there was concern that if something happened, they would lose some very critical data. I have written about the need to use multiple methods of backup for protecting your important data. This called for a different approach. I wanted to not only back up all of Joel’s files but also allow them to continue using the computer and all the software installed in case of a complete computer failure. This called for making a copy of the computer in such a way that it could be run virtually on another computer.
running Windows 7 ‘virtually’ in another computer
There are numerous methods for what is known as virtualizing a computer. What this means is that the files that make up the entire computer are stored on another computer. You start it up and can actually run the computer in a Windows on a second computer. There are numerous methods and programs that can virtualize a computer. The one I used is simple and can be free if you have a Windows 10 Professional (not home).
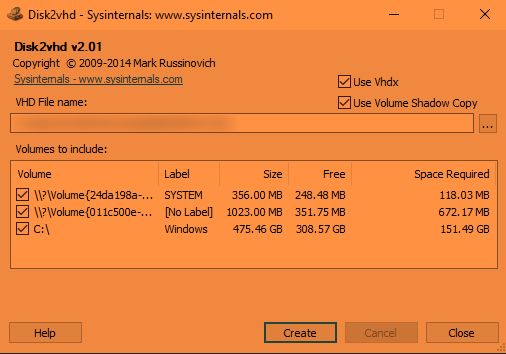
First, download disk2vhd from https://docs.microsoft.com/en-us/sysinternals/downloads/disk2vhd. This program is run on the computer to be virtualized. Make sure that you have an external hard drive to store the backed up data. Run disk2vhd.exe and select the volumes to include – generally you want to include all built in disks. Choose a save location (VHD File name) that is on the external disk you plugged in.
Disk2vhd is very straightforward to run
It will likely take a few hours to create the virtual disk. This will be a large file.
Once completed, copy the disk files to another computer. I suggest you also keep a backup copy somewhere safe as this can also be used to retrieve files and if something goes wrong with the virtual or original physical computer, you still have this copy. Enable Hyper-V on Windows 10 (see https://docs.microsoft.com/en-us/virtualization/hyper-v-on-windows/quick-start/enable-hyper-v)
Once Hyper-V is installed, run Hyper-V Manager and create a new virtual computer. Point to the .vhdx file that you copied from the hard drive as the source disk. Now you can boot up the virtualized computer. The first time it starts it will likely detect a whole bunch of new hardware. This makes sense since from the computer’s perspective, it has lost all its hardware and now has new ‘virtual’ hardware. Once this process completes, the computer will run very similarly to how it did before.
The End Result
Now there is a copy of the old computer. Our friend can work on her father’s estate and know that there is less risk to the data since there are multiple copies and now even multiple computers with the same data. Every situation is different but the key element to handling digital data in case of serious illness or death is preparation and ensuring that you use the right tools to make the important data accessible.
Let’s ensure that we deal with the things that we have control over.
There was a time when if you wanted to remind yourself to do something, there weren’t a lot of choices:
ask your spouse or a friend to remind you
put an entry into your paper based calendar
put up sticky notes where hopefully you see them
Now most of us have smart devices that travel with us everywhere we go. Just a look at the app store for either Apple or Google will give you tons of apps for task lists or reminders but every one of these devices has built in tools that help you ensure you don’t forget things.
The Reminders App
It comes with every iPhone. There are more advanced apps for tasks / reminders but the built-in one is very convenient, even if you use another one for managing your work projects and other complex tasks. I use Microsoft OneNote for planning out my tasks and projects but I have a suggestion for using the Reminders App for short term tasks. Let’s start with some examples we can all relate to.
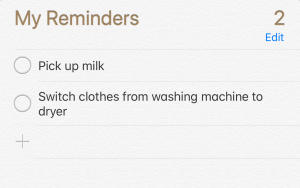
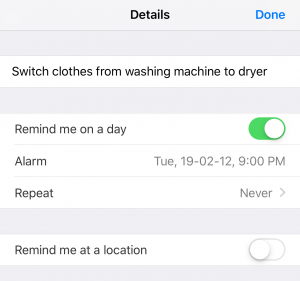
This happens to me all the time. My wife puts in a load of laundry and asks me to switch it to the dryer. I will say, “sure, no problem”. And then I forget and there’s wet clothes in the washing machine in the morning. There’s a better way – set a reminder in the app. But just setting the reminder doesn’t make the clothes move to the dryer. By going into the details part of the task, I can set it to remind me at a particular time and day
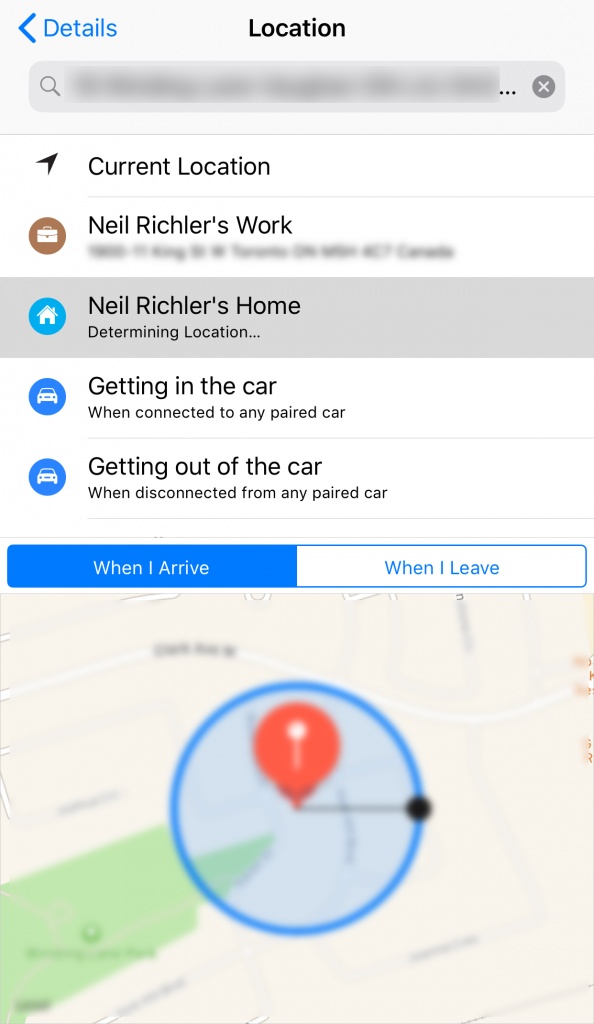
But let’s say that I also want to make sure that not only do I switch the laundry at 9pm but that I do this at home. Most current phones are able to sense current location so just set it to Remind me at a location.
After entering your location, you can choose to be notified when you arrive there. This is perfect for the type of reminder that needs to get done when you arrive home, even regardless of the time. Yes, you can set it with a location and no time or date.
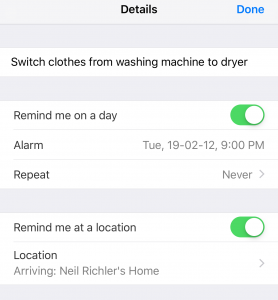
And now you can see the same reminder from above with both a time and date reminder plus location.
Calendar Reminders
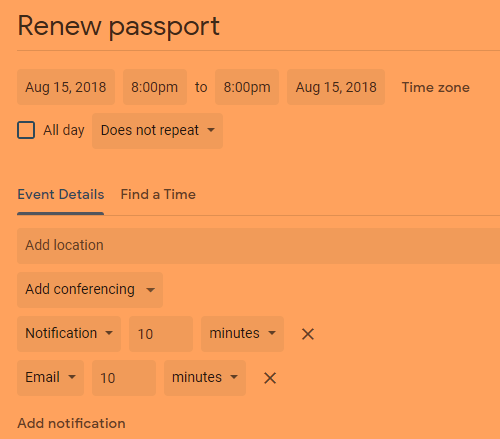
I use Gmail for email and calendars. For long term reminders and all of my other appointment needs, I use Google Calendar. What’s an example of a long term reminder? Let’s say your passport expires next year. Set a calendar entry for a few months before. Google Calendar lets you set notifications like pop-ups and emails. As the view below shows, this calendar entry will pop up at the right time and also will send an email.
Final Thoughts
We all have too many things to remember, be it as simple as changing the laundry or renewing an important document. Use the right tool for the right job. So often I think I will remember to do something and then I forget. Every time I set one of the reminders listed here, it’s like having a friend who’s always there to tell you when to do important tasks. Technology isn’t necessarily the answer to everything. If you like having a paper calendar, use it. Just think about how the phone in your pocket can do things that the paper calendar can’t.
What are your top tools for reminding yourself? Is it technology or something else? Let us know in the comments!
I have previously written about my method for organizing digital photos and videos. Within the many folders are thousands of files, most of which have been manually renamed. This naming and tagging of photos is a process that I started when my son was born in 2002 and has continued ever since.
Each file is individually named to tell either who is in the photo or briefly where or what the photos is about
How to label photos and videos
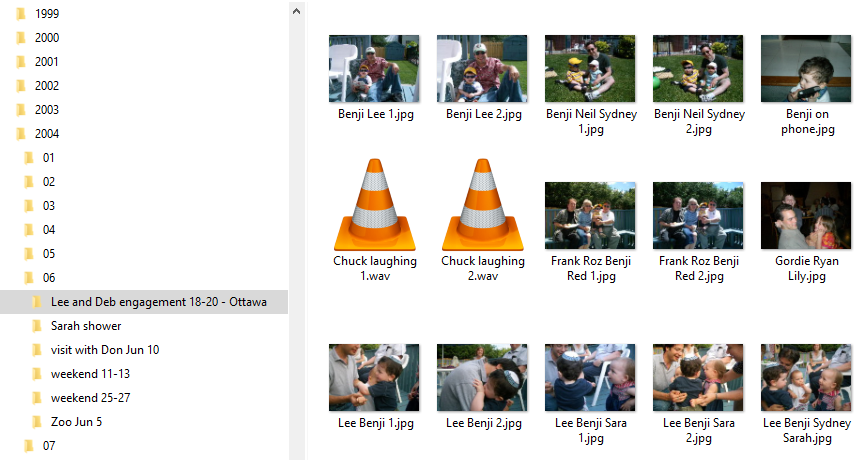
After I have taken pictures at an event or at the end of a month, I copy all of the photos and videos from my phone or camera to a folder on my computer, let’s call it “incoming photos and videos”. From this folder, I then copy groups of photos and videos to folders based on the date and event. For example, in the view above, there are numerous events in June 2004 that are each in individual folders.
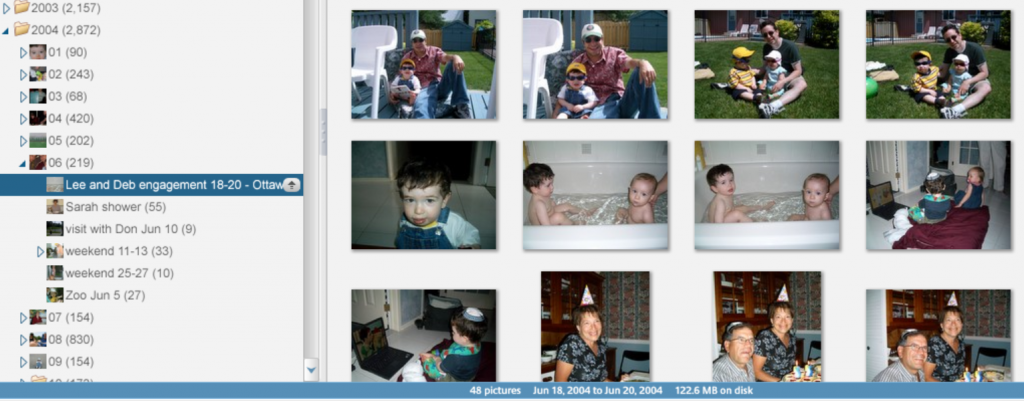
Within each folder, I then rename each file. I use a thumbnail preview in Windows Explorer or I use another program for managing photos. For years I used Google’s Picasa, which has now been discontinued. Even though Google no longer supports it, I often still use it for my viewing and renaming process.
A similar view from above but with Google’s Picasa software
Picasa, or most other photo management programs allows you to view a folder of pictures and easily make changes such as adjust brightness or rename. In Picasa, I can make the thumbnail views larger or smaller as needed.
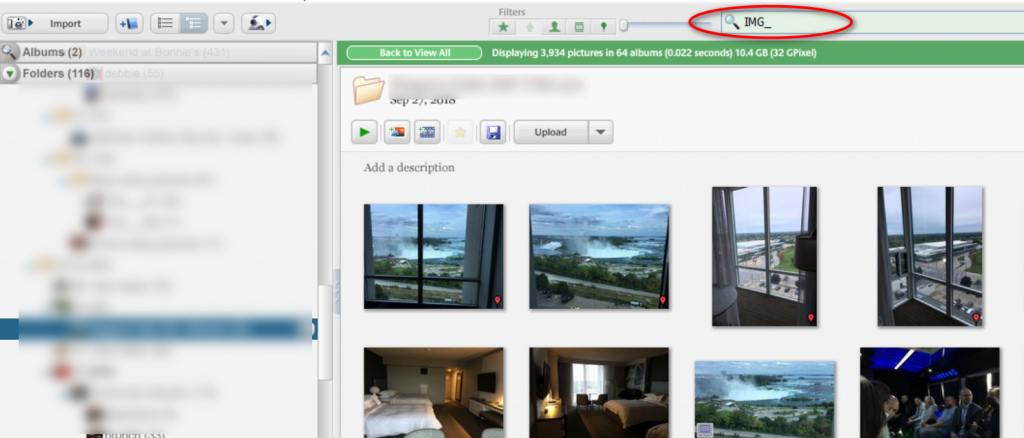
Another convenient feature of Picasa is that I can filter what pictures I want to see. For example, I take a lot of photos with an iPhone. These photos and videos are always named in the form of IMG_. By typing “IMG_” into the search bar, I can see all the photos and videos that I have not yet renamed. Other cameras have their own naming format so this is a way to find non-renamed files.
By searching for a specific set of characters, you can find files not yet renamed
For years I have gone about the process of renaming files. Sometimes it’s a bit more complicated when there is a group of 20 people. For these photos I usually simplify the name to something like “group at lunch”. The numerous photos of about 1 to 5 people are very easy to handle, just name the file with their names.
The Power and Benefits of Renaming Photos
Earlier I showed how I could narrow down photos that haven’t been renamed by searching for them in Picasa. I could do the same in Windows Explorer or in any photo management software. The real power is in finding what I have renamed. A few examples.
For my kids’ birthdays, I often make my own birthday cards. I can search across years of photos to find old pictures of them. I can search for pictures of the kids with specific people. Of course, if you have several people with the same name, you will have to go through a bunch of pictures to find the right one but even this can be handled by naming the files with first and last names. The main benefit of this system is that it’s independent of any computer or software. I can start this process on a Mac and then move all my files to Windows. In 10 years I can move these photos to some new computer and it should be able to handle the thousands of folders and files.
What about just using the cloud?
Yes, I can put all the above mentioned photos into Google Photos and let it sort it out for me. Google will let me view photos in chronological order and put together albums. It’s even gotten smart enough to detect who people are and once I tag them it will find them in future photos. Isn’t that more efficient than my system?
Yes, it is more efficient on the surface but what happens if Google goes away in 20 years or starts charging huge amounts for the service? I can get all my photos and videos out of Google but in what format? I’ll have just a massive folder, or maybe set of folders with files. I don’t think that in 20 years I’ll want to start labelling 100,000 photos and videos!
To me, the eventual solution may not yet exist. I would like to see the best of both. A program that runs on my computer and lets me manage my photos in simple folders and files. Add into this a plug-in to something like Google that analyzes photos and automatically renames them based on who is in them or some other criteria. That would make the process more efficient and have long lasting value as there still would not be a tie in to proprietary software.